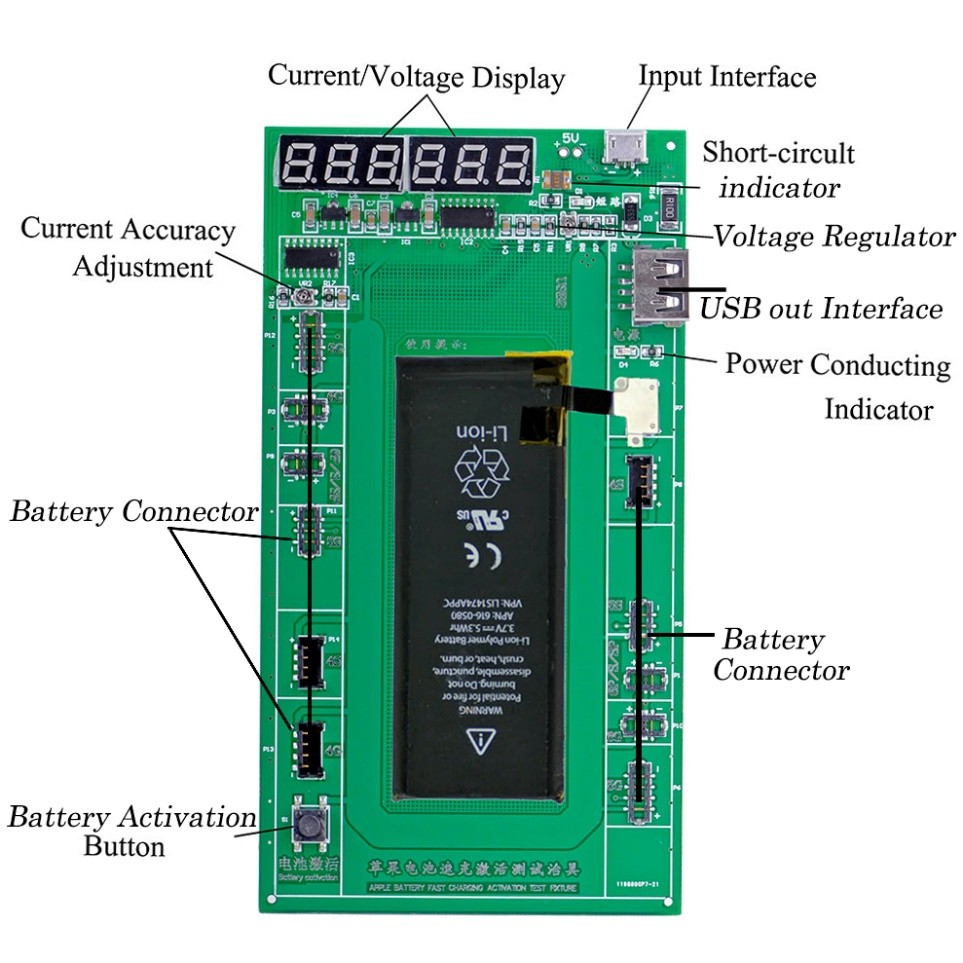
iPhone Battery Charger Activation Board Instruction

DC2017 Battery Fast Charger Activation PCB Board
Functions
of the Board:
1.
Activation of dormant batteries.
2. Fast and safe battery charging. Current adjustable from 1A~2A.
3. Overcurrent protection. The overcurrent protection will be activated
when current about 2.1A
4. Short-circuit detection.
Features of the Board:
1.
Compatible with iPhone 4, 4S, 5, 5S, 5C, 6, 6 Plus,
6S 6S Plus.
2.
2.5V↑ working voltage supply needed.
3.
Charging current up to 2A.
4. Advanced, fast and safe charging.
Trickle
Charging
Firstly we need to explain what is “trickle charging” before the
detailed instruction.
Trickle charging: set the power input voltage to 3.0~3.5V to make the charging
current between 100~200mA (check the current display on the board).
Then we need to explain the 3 situations when the battery connecting to
the board (without power input to the board):
1.
None of the indicator light turns on, which means
the battery voltage is lower than 2.5V
2.
Short-circuit indicator light turns on, which means
the battery is short-circuit.
3.
The power indicator light turns on and the displays
begin to show data, then the data shows on the voltage display is the voltage
of the battery.
And before explain the detailed instruction you need to know the
correspondence between battery voltage and battery capacity:
|
The Correspondence Between Battery Voltage and Battery Capacity |
||||||
|
Battery Voltage (V) |
4.2 |
3.95 |
3.85 |
3.73 |
3.5 |
Below 2.75 |
|
Battery Capacity (%) |
100 |
75 |
50 |
25 |
5 |
0 |
Detailed Functions and User’s
Instruction:
1.
Activation
Some of
the batteries will be dormant without using for a long time or with an
extremely low capacity, and you need to activate it before you can reuse.
Supply power
to the board with voltage between 3V~3.5V, the power indicator will turn green.
Then connect the battery to the board, and there might be 3 situations:
a.
Connect the battery to the board, the digital
voltage display shows data, and the voltage is above the input voltage which
means the battery is activated, and you can begin to charge the battery (we
will explain how to charge next.)
b.
Connect the battery to the board, the voltage shows
on the digital voltage display is lower than the input voltage (around 0.2~0.5V
lower), then you need to push the button “battery activation”, and the voltage
shows on the display higher than the input voltage, which means the battery is
successfully activated and you can begin to charge the battery.
c.
Connect the battery to the board, the voltage shows
on the digital voltage display, and it doesn’t change even you after you push
the “battery activation” button, which means the battery is broken.
2.
Charging
Supply
power to the board and connect the battery. We will explain the charging
function by 2 situations:
a.
The voltage shows on the digital voltage display is
above 3V:
You can
adjust the input voltage to adjust the current according to your requirement.
The charging current can be up to 2A.
b.
The voltage shows on the digital voltage display is
lower than 3V (including lower than 2.5V):
When
lower than 3V, or without voltage data (when it is lower than 2.5V, it will be
without voltage data), you have to use trickle charging 2 minutes firstly, and
keep the current between 100mA~200mA until the voltage rises to 3.2V, then you
can rise the voltage input and follow the instruction of situation 1.
3.
Overcurrent Protection:
The over
current protection will be activated when current about 2.1A to protect the
board and battery. If the overcurrent protection activated the current will
decline rapidly and the board will get hot, in this situation you need to wait
at least 30 seconds before you use it again.
4.
Short-circuit Detection:
If the short-circuit indicator light turns on when you connect the battery to the board, it means the battery is short-circuit and the board will stop working.
No posts found
Write a review